DokuWiki es un software wiki sencillo, tratable de usar y muy versátil, escrito en PHP. Es tirado, de código descubierto, y utiliza un sencillo formato de archivo para juntar sus datos en lado de utilizar cualquier sistema de almohadilla de datos. Ofrece muchas funciones que te ayudan a resquilar y optimizar tu sitio wiki fácilmente. Está ganando popularidad correcto a su sintaxis limpia y inteligible. Usando Dokuwiki, puedes crear tus sitios web personales o de empresa a través del panel web de Dokuwiki.
En este tutorial, te mostraremos cómo instalar DokuWiki con Apache y el certificado SSL Let’s Encrypt en Ubuntu 22.04.
Requisitos previos
- Un servidor con Ubuntu 22.04.
- Un nombre de dominio válido apuntando a tu servidor.
- Una contraseña raíz está configurada en tu servidor.
Instalar Apache y PHP
En primer lado, tendrás que instalar el servidor web Apache, PHP y otras librerías PHP en tu sistema. Puedes instalarlos todos ejecutando el ulterior comando:
apt-get install apache2 php php-gd php-xml php-json -y
posteriormente de instalar todos los paquetes, inicia el servicio Apache y habilítalo para que se inicie al originarse con el ulterior comando:
systemctl start apache2
systemctl enable apache2
Una vez que hayas terminado, puedes acontecer al ulterior paso.
Instalar DokuWiki Ubuntu 22.04
A continuación, visitante la página oficial de descargas de DokuWiki, copia la URL de descarga y descarga la última lectura de DokuWiki con el ulterior comando:
wget https://download.dokuwiki.org/out/dokuwiki-24117f7f9e0362c4b1782ff29220b0ab.tgz
Una vez finalizada la descarga, crea un directorio DokuWiki interiormente del directorio raíz de la web Apache y extrae el DokuWiki:
mkdir /var/www/html/dokuwiki
tar -xvzf dokuwiki-24117f7f9e0362c4b1782ff29220b0ab.tgz -C /var/www/html/dokuwiki/ --strip-components=1
A continuación, copia el archivo .htaccess de ejemplo con el ulterior comando:
cp /var/www/html/dokuwiki/.htaccess{.dist,}
A continuación, cambia la propiedad del dokuwiki a www-data:
chown -R www-data:www-data /var/www/html/dokuwiki
Una vez que hayas terminado, puedes acontecer al ulterior paso.
Crear un Virtualhost de Apache para DokuWiki
A continuación, tendrás que crear un archivo de configuración de host supuesto Apache para servir el sitio web DokuWiki. Puedes crearlo con el ulterior comando
nano /etc/apache2/sites-available/dokuwiki.conf
Añade las siguientes líneas:
<VirtualHost *:80>
        ServerName    doku.example.com
        DocumentRoot  /var/www/html/dokuwiki

        <Directory ~ "/var/www/html/dokuwiki/(bin/|conf/|data/|inc/)">
            <IfModule mod_authz_core.c>
                AllowOverride All
                Require all denied
            </IfModule>
            <IfModule !mod_authz_core.c>
                Order allow,deny
                Deny from all
            </IfModule>
        </Directory>

        ErrorLog   /var/log/apache2/dokuwiki_error.log
        CustomLog  /var/log/apache2/dokuwiki_access.log combined
</VirtualHost>
Portero y cierra el archivo cuando hayas terminado. A continuación, activa el archivo de configuración del host supuesto de DokuWiki y recarga el servicio Apache con el ulterior comando:
a2ensite dokuwiki.conf
systemctl reload apache2
Ahora puedes comprobar el estado de Apache con el ulterior comando:
systemctl status apache2
Deberías ver la ulterior salida:
? apache2.service - The Apache HTTP Server
     Loaded: loaded (/lib/systemd/system/apache2.service; enabled; vendor preset: enabled)
     Active: active (running) since Sat 2022-06-25 15:44:31 UTC; 4min 30s ago
       Docs: https://httpd.apache.org/docs/2.4/
    Process: 52450 ExecReload=/usr/sbin/apachectl graceful (code=exited, status=0/SUCCESS)
   Main PID: 52131 (apache2)
      Tasks: 6 (limit: 4579)
     Memory: 16.9M
        CPU: 331ms
     CGroup: /system.slice/apache2.service
             ??52131 /usr/sbin/apache2 -k start
             ??52454 /usr/sbin/apache2 -k start
             ??52455 /usr/sbin/apache2 -k start
             ??52456 /usr/sbin/apache2 -k start
             ??52457 /usr/sbin/apache2 -k start
             ??52458 /usr/sbin/apache2 -k start

Jun 25 15:44:30 ubuntu2204 systemd[1]: Starting The Apache HTTP Server...
En este punto, el servidor web Apache está configurado para servir el sitio DokuWiki. Ahora puedes proceder a instalar Let’s Encrypt SSL en tu sitio web.
Habilitar SSL en el sitio web DokuWiki
Para habilitar el SSL en DokuWiki, necesitarás instalar el cliente Certbot en tu sistema. El Certbot es una aparejo de Let’s Encrypt que se utiliza para descargar y diligenciar el SSL.
Puedes instalar el Certbot con el ulterior comando:
apt-get install certbot python3-certbot-apache -y
Una vez instalado, ejecuta el ulterior comando para instalar el SSL de Let’s Encrypt para tu sitio web:
certbot --apache -d dokuwiki.linuxbuz.com
Se te pedirá que proporciones tu correo electrónico válido y que aceptes las condiciones del servicio, como se muestra a continuación:
Saving debug log to /var/log/letsencrypt/letsencrypt.log
Plugins selected: Authenticator apache, Installer apache
Enter email address (used for urgent renewal and security notices) (Enter 'c' to
antipara): [email protected]

- - - - - - - - - - - - - - - - - - - - - - - - - - - - - - - - - - - - - - - -
Please read the Terms of Service at
https://letsencrypt.org/documents/LE-SA-v1.2-November-15-2017.pdf. You must
agree in order to register with the ACME server at
https://acme-v02.api.letsencrypt.org/directory
- - - - - - - - - - - - - - - - - - - - - - - - - - - - - - - - - - - - - - - -
(A)gree/(C)ancel: A

- - - - - - - - - - - - - - - - - - - - - - - - - - - - - - - - - - - - - - - -
Would you be willing to share your email address with the Electronic Frontier
Foundation, a founding partner of the Let's Encrypt project and the non-profit
organization that develops Certbot? We'd like to send you email about our work
encrypting the web, EFF news, campaigns, and ways to support digital freedom.
- - - - - - - - - - - - - - - - - - - - - - - - - - - - - - - - - - - - - - - -
(Y)es/(N)o: Y

Obtaining a new certificate
Performing the following challenges:
http-01 challenge for dokuwiki.linuxbuz.com
Enabled Apache rewrite module
Waiting for verification...
Cleaning up challenges
Created an SSL vhost at /etc/apache2/sites-available/dokuwiki-le-ssl.conf
Enabled Apache socache_shmcb module
Enabled Apache ssl module
Deploying Certificate to VirtualHost /etc/apache2/sites-available/dokuwiki-le-ssl.conf
Enabling available site: /etc/apache2/sites-available/dokuwiki-le-ssl.conf
A continuación, selecciona si deseas o no redirigir el tráfico HTTP a HTTPS como se muestra a continuación:
Please choose whether or not to redirect HTTP traffic to HTTPS, removing HTTP access.
- - - - - - - - - - - - - - - - - - - - - - - - - - - - - - - - - - - - - - - -
1: No redirect - Make no further changes to the webserver configuration.
2: Redirect - Make all requests redirect to secure HTTPS access. Choose this for
new sites, or if you're confident your site works on HTTPS. You can undo this
change by editing your web server's configuration.
- - - - - - - - - - - - - - - - - - - - - - - - - - - - - - - - - - - - - - - -
Select the appropriate number [1-2] then [enter] (press 'c' to antipara): 2
Escribe 2 y pulsa Intro para iniciar el proceso. Una vez completada la instalación, deberías obtener el ulterior resultado:
Enabled Apache rewrite module
Redirecting vhost in /etc/apache2/sites-enabled/dokuwiki.conf to ssl vhost in /etc/apache2/sites-available/dokuwiki-le-ssl.conf

- - - - - - - - - - - - - - - - - - - - - - - - - - - - - - - - - - - - - - - -
Congratulations! You have successfully enabled https://dokuwiki.linuxbuz.com

You should test your configuration at:
https://www.ssllabs.com/ssltest/analyze.html?d=dokuwiki.linuxbuz.com
- - - - - - - - - - - - - - - - - - - - - - - - - - - - - - - - - - - - - - - -

IMPORTANT NOTES:
 - Congratulations! Your certificate and chain have been saved at:
   /etc/letsencrypt/live/dokuwiki.linuxbuz.com/fullchain.pem
   Your key file has been saved at:
   /etc/letsencrypt/live/dokuwiki.linuxbuz.com/privkey.pem
   Your cert will expire on 2020-09-05. To obtain a new or tweaked
   version of this certificate in the future, simply run certbot again
   with the "certonly" option. To non-interactively renew *all* of
   your certificates, run "certbot renew"
 - If you like Certbot, please consider supporting our work by:

   Donating to ISRG / Let's Encrypt:   https://letsencrypt.org/donate
   Donating to EFF:                    https://eff.org/donate-le
En este punto, tu sitio Dokuwiki está protegido con Let’s Encrypt SSL.
Accede a la DokuWiki
Ahora, abre tu navegador y escribe la URL https://dokuwiki.linuxbuz.com/install.php. Deberías ver la pantalla de instalación de DokuWiki:
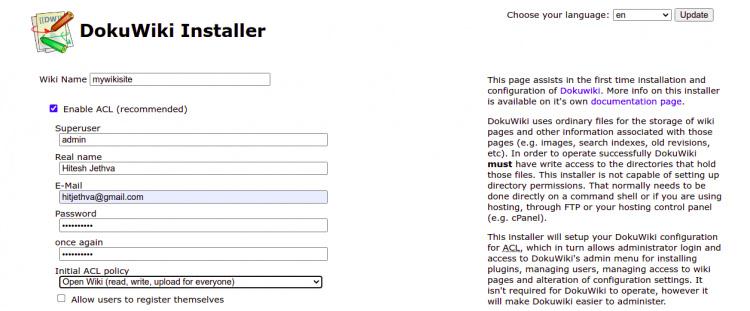
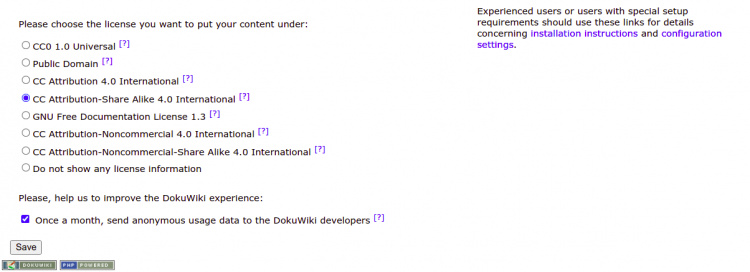
Introduce el nombre de tu wiki, el nombre de legatario administrador, la contraseña, el correo electrónico, elige tu política y pulsa el cogollo Asegurar. Serás redirigido a la ulterior página:
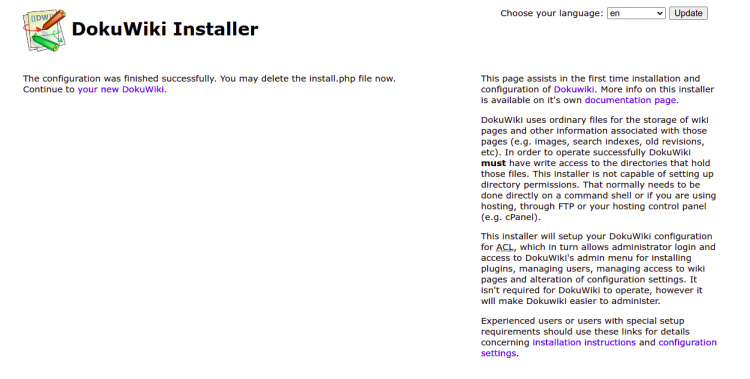
Haz clic en «tu nuevo DokuWiki». Deberías ver la ulterior pantalla:
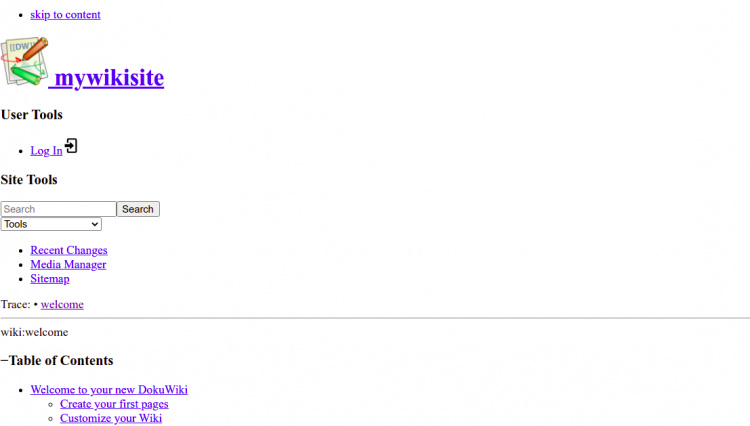
Haz clic en el cogollo Iniciar sesión. Serás redirigido a la pantalla de inicio de sesión de DokuWiki como se muestra a continuación:
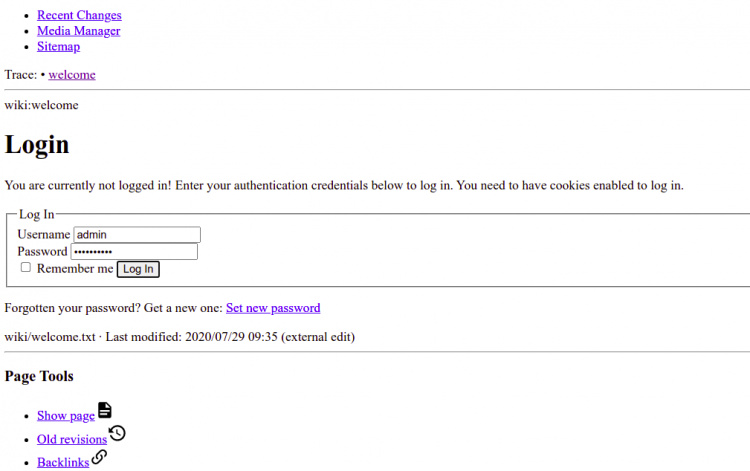
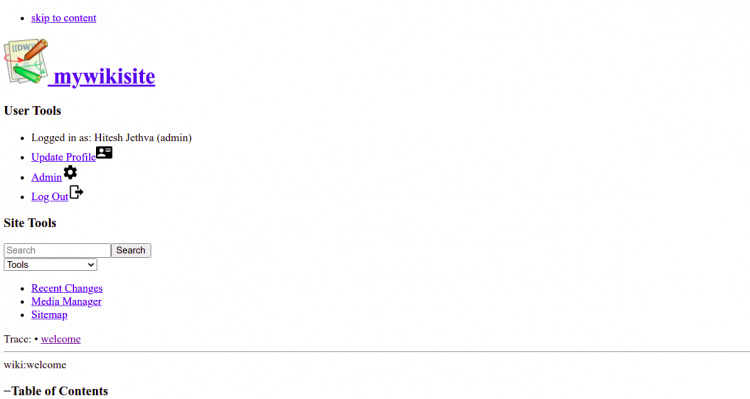
Introduce tu nombre de legatario y contraseña de administrador, y haz clic en el cogollo Iniciar sesión. Deberías ver el panel de control de DokuWiki en la ulterior pantalla:
Configurar la Renovación Cibernética
Por defecto, los certificados Let’s Encrypt son válidos durante 90 días. Por lo tanto, tendrás que configurar una tarea cron para renovar automáticamente el certificado SSL. Es seguro crear una tarea cron que se ejecute cada semana o incluso cada día.
Si quieres renovar el certificado SSL manualmente, ejecuta el ulterior comando:
certbot renew --dry-run
Puedes configurar una tarea cron para renovar automáticamente el certificado SSL todos los días a las 6:00 AM editando el ulterior archivo:
crontab -e
Añade la ulterior columna:
00 06 * * * root /usr/bin/certbot renew >/dev/null 2>&1
Portero y cierra el archivo cuando hayas terminado.
Conclusión
Enhorabuena! has instalado correctamente DokuWiki y lo has protegido con Let’s Encrypt SSL en Ubuntu 22.04. Ahora puedes crear tu propio sitio wiki utilizando DokuWiki. No dudes en preguntarme si tienes alguna duda.